Building Neuroclip, part 2 of 5. Part 1: the architecture · Part 2: VOD to short (you are here) · Part 3: the OBS Regie · Part 4: AI facecam upscaling · Part 5: shipping to Kubernetes. The product itself is on the Neuroclip page; it is in early access and I am its only user so far.
In part 1 I described the shape of Neuroclip: a Go server, a React dashboard and a few small Python helpers. This part follows one piece of footage through that machinery: a multi-hour Twitch recording goes in, a short vertical video with burned-in word-by-word subtitles comes out.
Neuroclip is a commercial product, so this post stays on the concept level: the ideas, the trade-offs and the general techniques, not a build plan. ffmpeg and Whisper do the heavy lifting. The engineering is in how a Go program drives them: keeping long-running child processes cancellable, not leaving half-written files behind, and staying out of the way of a game that runs on the same machine.
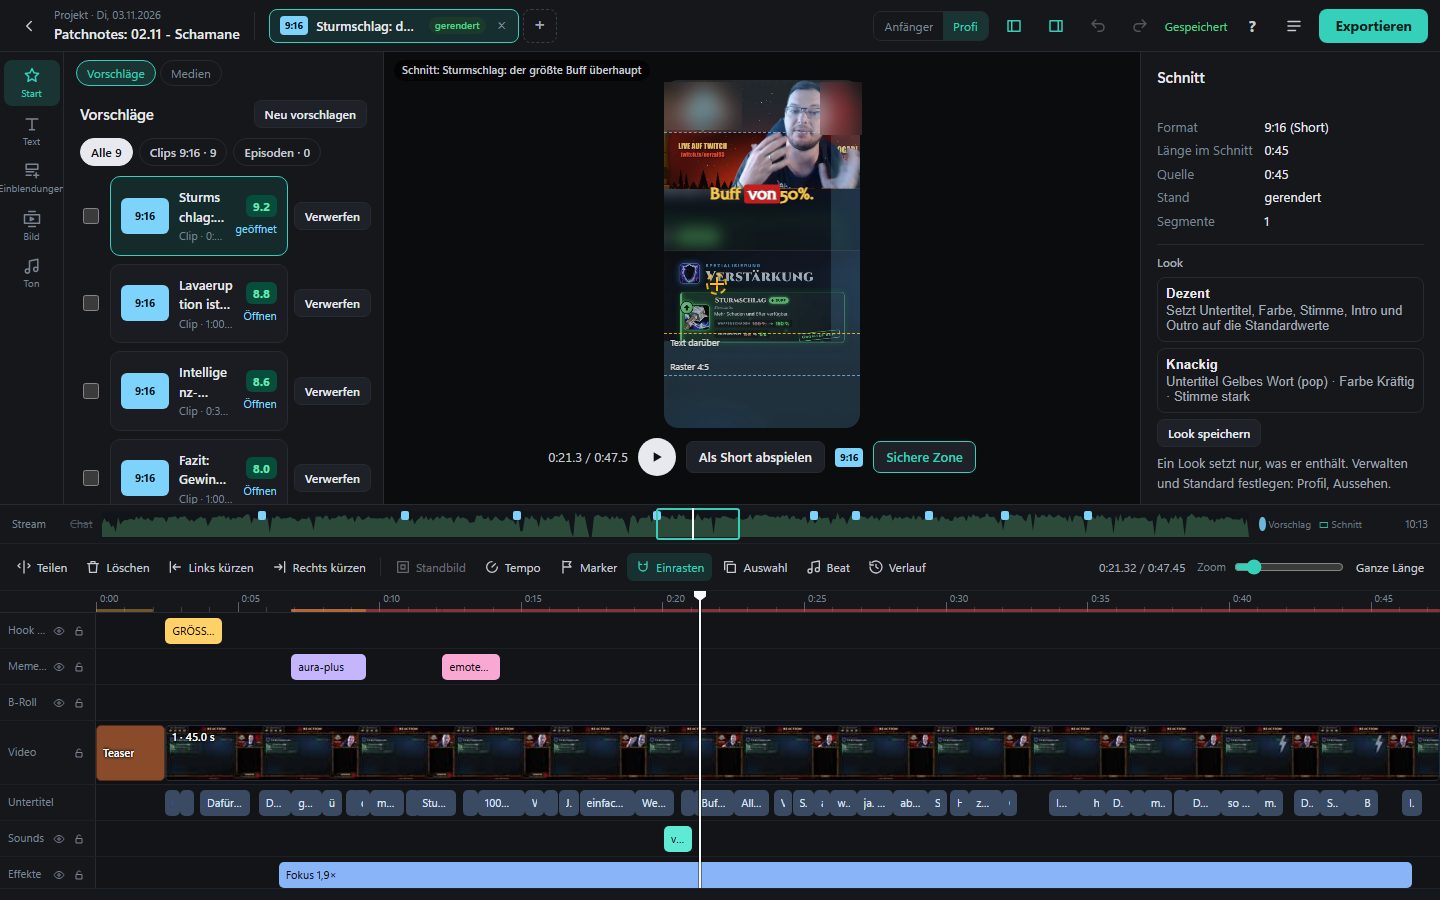
The project editor: the place where pipeline output is reviewed and corrected.
Stage 1: Getting the VOD
A Twitch VOD is an HLS playlist: a list of short media segments, specified in RFC 8216. Neuroclip downloads them itself in Go instead of shelling out to a downloader, and the reasons are all about failure handling:
- segments are loaded a few at a time into a scratch folder,
- a segment only counts once it has been renamed from a temporary name, so a stopped download resumes where it stopped,
- when all segments are there, ffmpeg joins them without re-encoding,
- a small metadata file is written last, and without it the video does not count as downloaded.
That “metadata file written last” trick is a cheap commit marker. Any code that asks “is this VOD available locally?” looks for the marker, never for the big file, so a crash in the middle cannot produce a video that looks complete but is not. The chat log of the stream is fetched alongside, because the pre-selection later uses it.
Before downloading, the code estimates the size and checks the free disk space with a spare margin. Running out of disk in hour three of a download is a failure you want to turn into an error message before the first byte.
Stage 2: Audio tracks, or why the mic gets its own
The most valuable decision for transcription quality happens in OBS, before Neuroclip is involved. I record several audio tracks: the full mix as heard on stream (kept as the first track, because most clip tools take the first audio stream by default), the microphone alone, and the game alone.
Why does this matter? A speech model that hears game explosions, alert sounds and a friend in a call at the same time makes worse guesses. Feeding it the microphone alone is the cheapest accuracy gain available. If a source has more than one audio track, the mic track is extracted into a temporary 16 kHz mono WAV; otherwise the mix is used. This is plain ffmpeg, and you can try it on your own recording:
Linux / macOS
# Extract the 2nd audio track (index counted from 0) as 16 kHz mono WAV
ffmpeg -hide_banner -loglevel error -y -i stream.mkv \
  -map 0:a:1 -ac 1 -ar 16000 -c:a pcm_s16le mic.wav
Windows (PowerShell)
# Same command in PowerShell; the backtick continues the line
ffmpeg -hide_banner -loglevel error -y -i stream.mkv `
  -map 0:a:1 -ac 1 -ar 16000 -c:a pcm_s16le mic.wav
To see what your own recording contains, use ffprobe, which ships with ffmpeg. The command is the same on both platforms:
ffprobe -v error -select_streams a -show_entries stream=index:stream_tags=title -of compact recording.mkv
Installing ffmpeg
To follow along with the filter graph below you need ffmpeg on your PATH. The download page lists all options.
Linux
# Debian / Ubuntu
sudo apt-get update && sudo apt-get install -y ffmpeg
macOS
# Homebrew (https://brew.sh/)
brew install ffmpeg
Windows (PowerShell)
# Windows 10/11 with winget (Gyan.FFmpeg is the full build)
winget install --id Gyan.FFmpeg -e
Stage 3: Speech recognition with faster-whisper
Recognition is a small Python helper that the Go server starts as a child process. I could have used a Go binding for Whisper, but the Python ecosystem around faster-whisper (a CTranslate2 re-implementation of Whisper) gives me CUDA support and word timestamps with the least code. It runs on the GPU and falls back to a slower, less accurate CPU model when no usable GPU stack is found: it should work everywhere and be good where it can.
Three ideas carry most of the quality:
- Word timestamps are the whole reason for this route. The word-by-word highlight in the final video needs a start and end time per word, not per sentence.
- Voice activity detection runs first, so silence and game noise are not turned into invented words.
- A vocabulary prompt built from the game’s character names and jargon. Whisper is a language model; telling it which unusual words to expect helps more than any post-processing. A list of manual corrections catches names it still gets wrong.
The recognition runs as a stream of segments, so the helper can report progress while a long recording is processed. The result is a cue list: one entry per subtitle line with its text and the start and end of every word, shared between transcription and renderer as one Go type. I have not benchmarked a range of models, so I give no numbers here.
Stage 4: Picking candidates without an LLM
Which 45 seconds of a four-hour stream deserve to become a short? One way is to let Claude read the transcript and score windows, and Neuroclip can do that. It costs money per run, and it has a failure mode I did not like: when the API is down or the budget cap is reached, the whole feature is dead.
So the pre-selection is plain, deterministic Go. It merges independent signals about the stream into one ranked list, each moment with a score and a reason in words:
- how loud and excited a stretch of audio is,
- hype words in the transcript,
- spikes in chat activity,
- moments I marked myself while streaming (see part 3),
- clips that viewers made on Twitch.
Each signal contributes with its own weight. Signals that land close together in time count as one moment, and a moment confirmed by several different kinds of signal ranks higher than one with a single strong signal. The weights are named constants in code, so tuning is a reviewable change rather than a prompt experiment.
The chat signal is the interesting one. Chat reacts a few seconds after the thing happened, so message times are shifted back. A burst is judged against the local level of chat activity, not a global threshold, which means a quiet stream with a sudden burst is detected just as well as a busy one. If you build something similar, tune the numbers on your own audience.
The suggestion threshold is not fixed either. It starts from a default and adapts to what I actually finish and what I throw away. What a person picked by hand, a marker or a viewer clip, is always suggested regardless of the score.
Claude is an optional layer on top. With Claude enabled, the pre-selection only attaches its reasons to the candidates and Claude scores them; without Claude the editor shows the rule-based list directly. Both paths end in the same editor, and the reasons are plain sentences, so the list explains itself.
Stage 5: From 16:9 to 9:16
A stream is 1920 x 1080 with the facecam somewhere in the frame. A short is 1080 x 1920. The layout is the classic stack: facecam strip on top, gameplay below.
Two rectangles describe the layout, and where they come from has an order of precedence: an explicit choice for this render wins, then the layout recorded for this particular stream, then the profile default. The middle one exists because I changed my stream overlay over time. A short cut from an older stream with today’s profile box would show a cut-off face, so the layout is recorded once per stream.
The filter graph
The renderer assembles an ffmpeg -filter_complex string from numbers and fixed fragments. Read the following as a pipeline: split duplicates the video, each copy is cropped to its box and scaled to full width, and vstack stacks the two strips. Both strips need even dimensions, because H.264 with 4:2:0 chroma subsampling requires it. This generic example uses illustrative numbers for a 480 x 270 webcam box in the top right and a roughly portrait game box:
Linux / macOS
ffmpeg -ss 600 -t 30 -i vod.mp4 -filter_complex \
  "[0:v]split=2[a][b];[a]crop=480:270:1440:0,scale=1080:608[c];[b]crop=880:1070:100:5,scale=1080:1312[g];[c][g]vstack" \
  -c:v libx264 -crf 20 -preset veryfast -pix_fmt yuv420p -c:a aac short.mp4
Windows (PowerShell)
ffmpeg -ss 600 -t 30 -i vod.mp4 -filter_complex `
  "[0:v]split=2[a][b];[a]crop=480:270:1440:0,scale=1080:608[c];[b]crop=880:1070:100:5,scale=1080:1312[g];[c][g]vstack" `
  -c:v libx264 -crf 20 -preset veryfast -pix_fmt yuv420p -c:a aac short.mp4
(608 + 1312 = 1920. Replace libx264 with h264_nvenc if you have an NVIDIA GPU.)
Two refinements are worth knowing about:
- Aspect-ratio tolerance. If the game box has roughly the shape of its strip, it is simply cropped and scaled. If it is a very different shape, it is fitted without distortion in the middle of the strip, and the rest of the strip shows the same picture enlarged, blurred (
boxblur) and darkened. That is the familiar blurred-background look, built from the same filter vocabulary. - Long graphs go to a file. With effects and overlays the string can get long, so it is better to put it in a file and pass that to ffmpeg than to risk command-line limits. Since ffmpeg 7.0 the way to do that is the generic
-/option filesyntax, here-/filter_complex graph.txt; the older-filter_complex_scriptstill works but is deprecated.
Because the process is started with an argument list instead of a shell, and the graph is assembled from numbers and fixed fragments, there is nothing for a malicious input to inject into. User-controlled text that ends up in the subtitle file gets the same care, which brings us to subtitles.
Word-level subtitles in ASS
The burned-in subtitles are an Advanced SubStation Alpha (ASS) script that ffmpeg’s ass filter renders. I chose ASS over SRT because ASS can style individual events, position text freely and draw a box behind a word, while SRT cannot. The builder writes one event per spoken word: the block of text is shown for the duration of its line, and during each word’s time span exactly that word gets the highlight. Highlight style, font and colours are configurable.
Anything a user can type ends up inside this script, and ASS has its own control syntax: { starts override tags and a backslash starts an escape. So text is sanitised before it enters an event, and style overrides are validated. That is input sanitising for a format nobody thinks of as an attack surface until a viewer’s chat message ends up in it.
The safe zone
Vertical platforms cover parts of the picture with their own interface: a header at the top, buttons at the side, controls at the bottom. Burned-in text has to stay clear of those regions, so the editor draws a safe-zone overlay. The margins are my own working values for the platforms I post to, not an official specification, so check the current guidelines of your platform.
Stage 6: Hardware encoding, and what to do when it fails
NVENC is the hardware encoder on NVIDIA GPUs; it takes the encoding load off a CPU that is also busy running a game. The renderer tries the GPU encoder first and has a matching x264 fallback.
The robustness is in the retry rule. If NVENC fails, the renderer retries with x264, but only when the failure plausibly is the GPU’s fault: the ffmpeg error output mentions the encoder, CUDA or the driver, or there is no message at all, which usually means the process was killed. If the error is about the filter graph or a missing file, a second attempt with x264 would fail identically, after minutes of work, so it stops immediately. A cancelled job is not retried either: that is not a missing GPU. A cheap probe that encodes a few frames of a generated test pattern tells the program once whether hardware encoding is available at all.
After rendering, a second pass measures the loudness of the short and, if it is clearly off target, applies one linear gain while the picture is copied without re-encoding. That pass is allowed to fail: a failure becomes a note, not an error.
How Go drives external processes robustly
Everything above is useless if a render can hang forever, leave a corrupt file, or freeze the game you are streaming. These are general patterns that work for any tool that wraps ffmpeg.
1. Context cancellation everywhere. Use exec.CommandContext, so cancelling the context kills ffmpeg. Map a cancelled run to one well-known error, so callers do not misread “the user pressed cancel” as “the encoder is broken”.
2. Part files and atomic rename. Write to a temporary name and rename it over the real name only after ffmpeg exited with 0. On any error or cancellation, delete the part file and keep the previous output. Nothing downstream can mistake a half-encoded file for a finished one. Keep the original extension in the temporary name, because ffmpeg selects the muxer from it.
3. Progress without scraping stderr. ffmpeg can write machine-readable progress to a file with -progress <file> -nostats. Poll that key=value file and divide the output time by the expected length to get a share from 0 to 1 for the UI.
out_time_us=12480000
out_time_ms=12480000
progress=continue
(out_time_ms is, despite the name, also in microseconds.)
4. Background priority. When the tool runs on the streaming PC itself, renders should give way to OBS and the game. Children inherit the priority of their parent, so lowering it for the processes you start also covers a Python helper that starts ffmpeg. On Windows that is a process creation flag; on Linux you can wrap the command in nice. ffmpeg’s own thread limits help too.
5. Processes without a shell. Start tools with exec.Command(name, args...), never through a shell, and stream their output into a log your UI can follow. On shutdown, kill all children and wait for them, so no helper outlives the server and keeps writing files. On Windows, kill the whole process tree.
6. Panics do not end the process. Run goroutines through a wrapper that recovers and tells its owner, so state can be reset. A stuck “stream ending” flag would otherwise block the next run.
The standard library does most of this: os/exec, context and os.Rename. My Go and Docker post covers shipping such a binary.
Stage 7: Review and checks
A render is not done when ffmpeg exits. After a short exists, automatic quality checks look at the edit, the final render, the camera crop and the loudness. Each returns ok, warning, problem or “could not run”, and the dashboard condenses them to a traffic light.
The key design rule: a check is a soft step. A failing or missing check never fails the job. A broken checker should not prevent me from seeing the video.
Shorts are only the first of two products. The same building blocks feed a pipeline for longer YouTube episodes, where one decision shows the philosophy: shorts burn subtitles in, episodes ship a subtitle track, because burned-in text is a nuisance on long videos and YouTube indexes caption tracks.
What is still rough
- The project is early access and single-user. Every path above has been exercised on my machine, with my overlay and my recordings. I have not verified it on other setups.
- The filter-graph and subtitle code grew organically. It has tests, but it is the first place I would refactor.
- Speech recognition is only as good as the microphone track and the vocabulary prompt. Unusual names still need manual corrections.
What’s next
Next is the part that turns the stream itself into data: part 3 covers the OBS Regie, the control room that talks to OBS, raises alarms and writes the markers this pipeline scores so highly. If you want to see the whole thing rather than read about it, the Neuroclip page has the details and the early access waitlist.